Finding and reusing existing data
Last updated on 2026-06-16 | Edit this page
Estimated time: 40 minutes
Overview
Questions
- How do you find data in Yoda?
- How do you work with data and metadata in Yoda?
Objectives
- Demonstrate how to search for datasets in Yoda
- Show how to work with the data in a dataset
- Explain the difference between the Research area and the Vault area in Yoda
As an instructor, make sure you prepare a folder with a picture of the dress. It should be in the Vault area and workshop participants should have access to it. Also make sure that the words “Mondrian” or “Yves” are present in the metadata, but not in the file or folder names. You can use the folder published on GitHub to prepare the folder in Yoda. Make sure the dataset is in the Vault and removed from the Research area in Yoda.
Introduction
In this scenario we are going to pretend that you are a researcher who knows a dataset exists in the Vault of the Yoda instance you are working in. You only know some information about that dataset (i.e.: some metadata), but you know you want to use the data in the dataset.
By the end of the exercise you will know how to search for datasets in Yoda and work with the data in a dataset. You will also learn the difference between the Research area and the Vault area in Yoda.
For the exercises today, we will be alternating between the Research and the Vault tabs. The idea behind those two tabs is that there is one working area, separated from a frozen area.
The working area is where you perform all the usual data and metadata managing. Think of operations related to adding, removing, modifying or shuffling files around (for the data), and also analogous operations for the metadata. The frozen area is a place to make datasets unmodifiable, sort of snapshots if you will, so that they can be safely used by others.
In Yoda’s terms, the working area is the Research tab from the menu, and the frozen area is the Vault.
Preparing a working place in the Research space
When you log into the the portal of a Yoda instance (or Yoda server, or, from now on simply Yoda) you are confronted with a screen showing a menu bar at the top. That menu bar allows you to choose between, at least, two tabs; namely: Research and Vault.
We will pretend that you are working in a project of your own. You will therefore need to create a folder for that project. Since you want to work actively with a dataset for this exercise, you will now create that folder in the Research area.
Here are the steps you need to follow:
In the Yoda portal, click on the Research tab of the main menu.
You can see one folder or a list of folders. These are the groups that you are a member of. From the list of folders that appear, click on the
research-tutorial-unsupfolder.You will create a folder here to represent your project. Do so by clicking on the Create Folder button.
Give the new folder you are creating a name similar to “Project X”, where X should be something that you will be happy to work with, like: “Project Peter” or “Project Flamingos”. Please, remember what you choose, because the rest of the course attendants will be creating their own folders here too, so you may see a different list every time you look.
You are now set to go! This project folder will be the place where you will import the dataset that you are going to search for in the following section.
Searching for a dataset in the Vault
In Yoda you can search in the Vault for datasets that have been placed there by you or others within the groups of which you are a member. Yoda requires that you choose in which parts of a dataset you want to search, and the options it offers include:
search by file name
search by folder name
search by metadata
search by status
As explained at the beginning, you are pretending now to be a researcher in need for a dataset that you know exists in this Yoda instance. The information you have is little: it involves a picture of a famous Mondrian dress by Yves Saint Laurent. That is precisely what you need for your research! Let us find it now.
Challenge 1: search by filename
Can you find the file?
1. In the Research tab of the Yoda portal, see that there is a search box at the top
2. Type in the search box a word or words that you think are reasonable for the little information you have about the dataset, such as: “dress” or “Mondrian” or “Yves”
3. Hit “Enter” or click on the magnifying glass button to the right of the search box
The result is probably going to disappoint you: you will not find anything. By default, when you search this way, you exercise a “Search by file name” (see that “search by filename” is selected on the drop-down list to the left of the search box). Let us try a different search method in the next section.
Challenge 2: Search by folder
Can you find the folder?
1. To the left of the search box of the previous search, choose now “Search by folder”.
2. Type in the search box a word or words that you think are reasonable for the little information you have about the dataset, such as: “dress” or “Mondrian” or “Yves”
3. Hit “Enter” or click on the magnifying glass button to the right of the search box
The result is probably going to disappoint you this time as well: you will not find anything. Let us try yet a different search method.
Challenge 3: Search by metadata
Can you find the metadata?
1. To the left of the search box, choose now “Search by metadata”.
2. Type in the search box a word or words that you think are reasonable for the little information you have about the dataset, such as: “dress” or “Mondrian” or “Yves”
3. Hit “Enter” or click on the magnifying glass button to the right of the search box
Voilà! You should now have at least one result. However, how do you know what is the good one? You will have to bring it to your working area in order to inspect it.
🍝 🍔 🍜 Food for thought
What is the name of the root folder of the dataset? Is this folder in any way related to the name of any of the folders you can see in the Research area? How is it related?
Importing a dataset to the Research space
You are now going to import the dataset you found in the Vault, into the project folder that you created in the Resarch area a few steps ago. Remember? You called it Project <something>.
From the list of results of your search, click on the one that you want to work with (a hint: perhaps on the latest modified date, or after viewing the contents).
Note that you are now in the Vault tab from the main menu. That is because you are working with a dataset that was brought to the Vault as a way to “share it in an unmodifiable state”.
Challenge 4: inspect the metadata
Click on the Metadata button. Can you answer now some of the questions below? For example: can you explain why you were not able to find the data set when searching by name or by folder, but you were when you searched by metadata?
Questions:
What is the file name of the picture?
What is the folder name of the picture?
When was the picture taken?
Who took the picture?
Which location tag has been given to the picture?
What does the picture show (i.e., can you describe what the photograph has captured)?
Click on the “Close” button of the pop-up that is displaying the metadata. You should be seeing the folder contents again.
In order to import the dataset into your Project folder, click on the Actions button now. Then select the option that reads: “Copy datapackage to research space”.
-
A pop-up will appear displaying your groups:
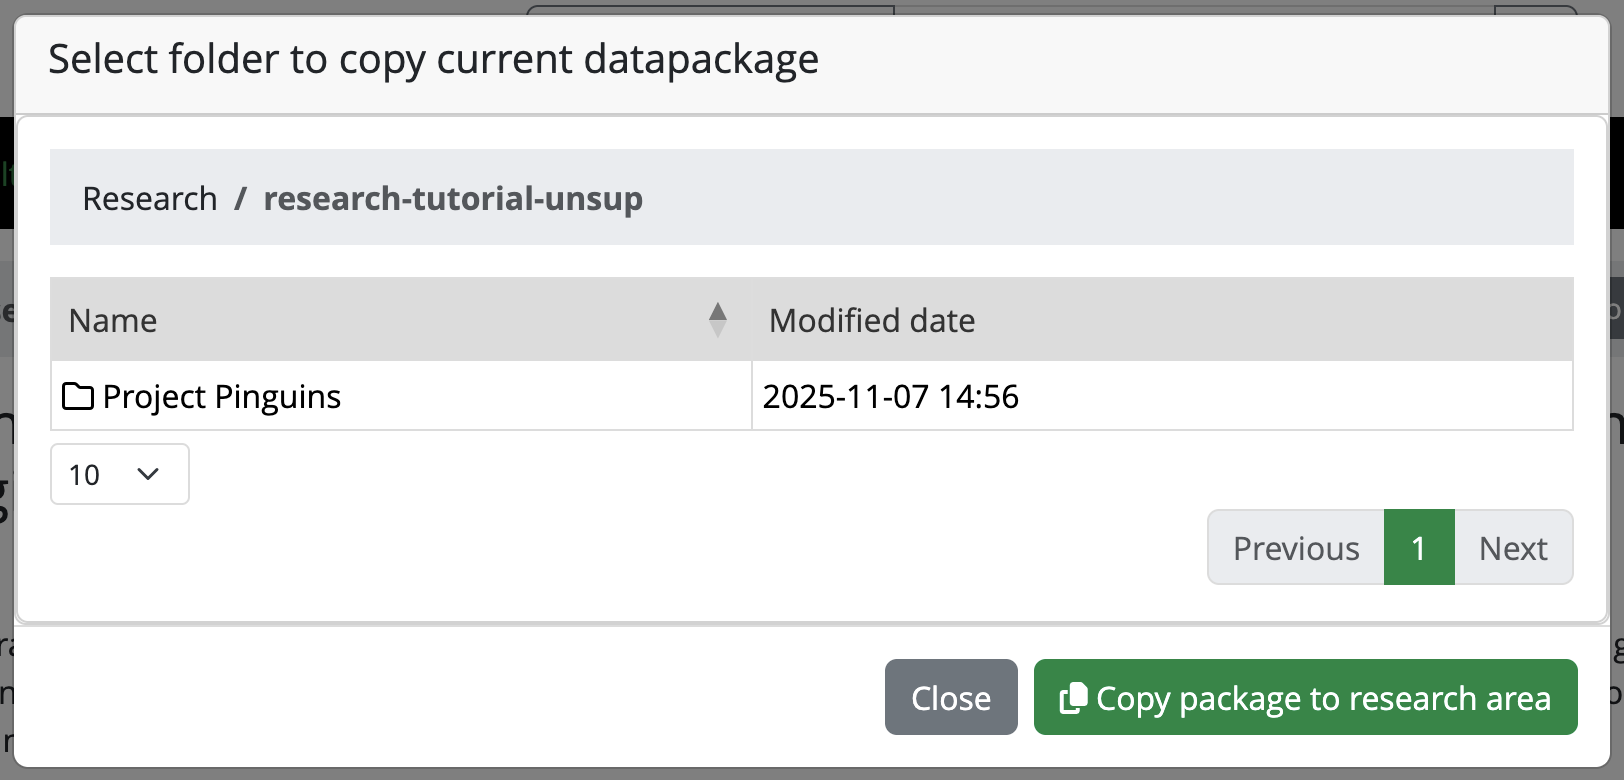 Picture of the pop-up for copying the datapackage to research space
Choose the
research-tutorial-unsupfolder. Then choose your Project folder within it. When you have selected your Project folder, click on the button “Copy package to research area”.
Working with the dataset
You have now found and imported a dataset from the Vault into your Project folder. Let us simulate that you reuse the data by looking at the picture!
In the Yoda portal, click on the Research tab from the main menu
Navigate to your Project folder by clicking the
research-tutorial-unsupfolder, and then click on your Project folder.You should now see a new folder in your Project folder, whose name includes a large number between square brackets. This number is a Unix epoch, which you can consider to be a timestamp indicating when you made a copy of the folder. This notation prevents unexpected overwrites when moving datasets around.
Click on the new folder name. You will see it has another folder within it called
original, and there is ayoda-metadata[epoch].jsonfile there as well. If you click the Metadata button, it will be empty. How come!?Well, look in the
originalfolder instead. Click, therefore, on theoriginalfolder. You should see a picture file and ayoda-metadata.jsonfile as well.Click on the Metadata button now that you are in the original folder. You should see a lot of metadata fields, and you can even modify them! This metadata should be the same you saw before you imported the dataset into your working area.
You can click on the “Close” button of the form to go back to the list of files.
In order to simulate using the data, you can now click on the name of the picture file. That will display the picture in a pop-up. Alternatively, you can click on Download to simulate that you save a dataset onto your laptop’s hard drive.
Lastly, click on the
yoda-metadata.jsonfile, which will preview the .json file in your browser. You can also open this .json file on your laptop with your favourite text editor. Can you identify any of the information there? Exactly! It is the same metadata as you see when you click on the Metadata button of the folder. Handy, right? This way you will always have the metadata along with the data, in a machine-readable format!
You have now completed this section. Feel free to move on to the next exercise at your own pace, but make sure you have answered the questions in the challenge above to verify that you have found the intended dataset.
- You can create folders and upload files in the Research area
- You can search for files, folders, and metadata for Groups that you have access to
- Copy a datapackage from Vault to Research space to continue working with it
- Look at the metadata to learn more about a dataset